


React native lets you create cross platform (Android & ios) mobile apps with Javascript.
" According to the official website , React Native combines the best parts of native development with React, a best-in-class JavaScript library for building UI ."
So if you know javascript and React learning native might be a cake for you !
There are two methods of creating the native apps, one with native CLI and other with the help of expo client. Expo is kind of superset of CLI client with added functionality. With expo, setting up the development environment is easy so we will be using it.
Getting Started->
Setting Up the development environment-> -
//for installing expo globally
npm install --global expo-cli

//creating our app
npx create-expo-app my-app
-For running the app move to root directory of app and use expo start command
cd my-app
expo start
- You can watch live changes using simulator or using your android or ios device. The easy way is to download expo go app from the play store or app store.
- Scan the QR code provided after starting expo start command.
- Now all your live changes can be viewed on your app.
- If your app is not refreshing or stuck just press r on the terminal.(reload).
Creating our first app->
Some important components of React-native before diving into it->
-In above code we are importing Stylesheet , Text and View from native.
Stylesheet->to create css for our component
- For using it
//example
<Component  style={styles.nameOfStyle}/>
- For using it
Text-> for creating text component in our app
- View -> creates a view in which all our components reside like text,image kind of like div etc.
Image->for inserting images -Button ->for inserting button
Open app.js file , this is the main file for your code.
- Below is the boiler plate so you can paste that and run it for reference.
import React from 'react';
import { StyleSheet, Text, View } from 'react-native';

export default function App() {
  return (
    <View style={styles.container}>
      <Text>To share a photo from your phone with a friend, just press the button below!</Text>
    </View>
  );
}

//creates a stylesheet for your app
//kind of like css code
const styles = StyleSheet.create({
  container: {
    flex: 1,
    backgroundColor: '#fff',
    alignItems: 'center',
    justifyContent: 'center',
  },
});
After writing above code use
expo start
Your app will look like this
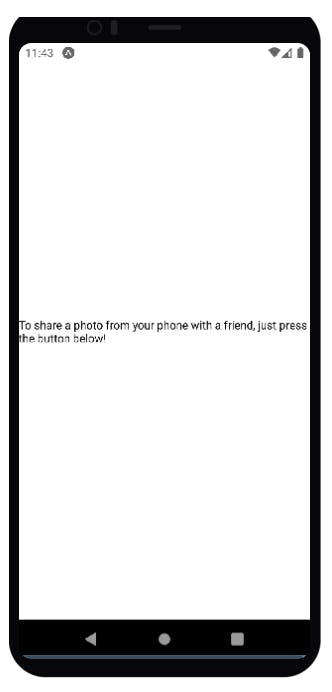 -You can style it by using the stylesheets above.
Using Images->
-Images can be added by two methods one by importing from any folder or by using url
- If using url
import {Image} from "react-native"; <Image source={{ uri: "https://i.imgur.com/TkIrScD.png" }} style={styles.logo} /> - If using from any folder (static)
import {Image} from "react-native";
import logo from './assets/logo.png';
<Image source={logo} style={{ width: 305, height: 159 }} />
Using Texts and Button
import {Text} from "react-native";
<Text> This is the text component </Text>
<Button name="Button" />
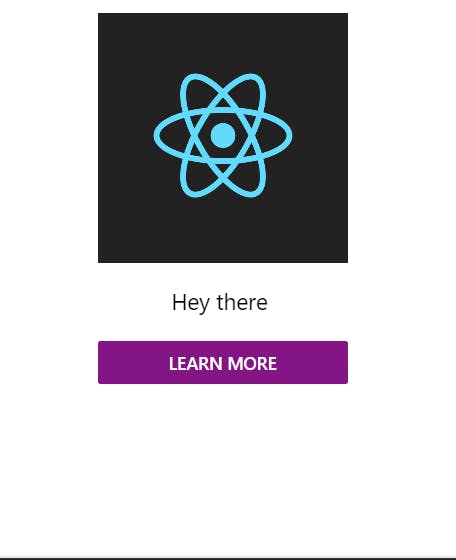
Putting it all Together
import React from "react";
import { Button, Image, StyleSheet, Text, View } from "react-native";


export const App=()=>{
  return(

    <View style={styles.app}>

      <Image style={styles.image} source={{uri:'https://reactjs.org/logo-og.png'}}
       />
      <Text style={styles.text}>Hey there </Text>
      <Button
  title="Learn More"
  color="#841584"
/>
  </View>
  )

}

const styles = StyleSheet.create({
  app: {
    marginHorizontal: "auto",
    maxWidth: 500
  },

  text: {
    lineHeight: "1.5em",
    fontSize: "1.125rem",
    marginVertical: "1em",
    textAlign: "center"
  },
  image:{
    marginTop:10,
    width:200,
    height:200
  }
});

export default App;

)
}
Result ->
So that's all for today. Make sure to subscribe the newsletter for latest articles on native development.